Monday, December 23, 2013
D-Zone Box+1
Saturday, November 9, 2013
Simple principles of better team play
Kevin Costantine (NHL Coach): “Many little things done right by everyone, has more power than a few people doing one big thing right.”
Every coach talks about the importance of fundamentals because without them it is virtually impossible to become a high-level player. Furthermore, without fundamentally sound players, it’s tough to have a winning team. In addition to individual skill-based fundamentals, there exists some tried, tested and true principles that I consider hard and fast axioms of the game of hockey. You as a player need understand these principles. The first four principles we need to understand for better team play are:- Primary scoring area (War zone)
- Control the middle of the ice
- Learn to control time and space.
- The concept of supporting the play.
Primary scoring area (War zone)
The most important events of the game happen in the prime scoring area (or the War Zone). Successful teams can do many things improperly in others areas of the ice, but if they know how to play well in front of both nets (offensive and defensive), they immediately have a better chance of winning.
The middle of the ice in the neutral zone is important as well. When defending, the ability to establish position so as to deflect (direct) attacks to the outside is an effective weapon. The ability to move the puck through the middle of the ice while attacking improves prospects for successful offensive play.
Keep in mind, no matter what happens you should always protect the area between the dots. If you are a winger that gets caught in the wrong position, or are back checking, quickly get yourself back to the inside of the dots with your stick on the ice!!! Back checking along the boards is a waste of time more times than not. PROTECT THE MIDDLE OF THE ICE! The Principle of “Time and Space”
The offensive team needs both time and space to execute its attacks successfully and get the puck in the primary scoring area (War zone). Everything the offense does is predicated on creating more time for the puck carrier and more space free of checking pressure from the opponents.
FACT: Any player, even if poorly skilled, can make a good offensive play if given enough time and space.
Teams that play a high-pressure defensive system with pinching defensemen tend to emphasize taking away time. They create intense pressure on the puck carrier in the hope that the opponent will make a poor decision.
Other teams use a more controlled defensive system that emphasizes taking away critical space first, before initiating pressure on the puck carrier.
Then there are teams like ours that use a blended approach. We use a 2-3 fore check that allows 2 player to apply pressure on the puck taking away time, and the other three to set up and take away critical space.
Ways to create Time and Space:
- Pass to open ice allowing a team mate to skate into it as shown below.
- Skate laterally into open ice while the defenders continue to back up as shown below.
- Delay by slowing down, stopping, escaping or pulling up to buy time for teammates to get open or in the zone.
- Protect the puck until a team mate can get open for a pass or move to support the puck carrier.
- Use the net as a pick to gain extra time and space.
- Get in the way of the opposing players (provide a pick), allowing the puck carrier time and space.
Create time and space by passing to open ice. F1 feels the pressure of the opponent and makes a pass to open ice allowing F3 to skate into the pass.
Creating time and space by skating laterally. F2 skates laterally or parallel to the blue line while defenders are backing away. Allowing your teammates to gain entry or get deeper into the offensive zone. BUT you need to come in with speed! Defenders fear and respect speed, they will meet you at the blue line if you come in slow, so generate speed through the neutral zone! The principle of Support
This principle is KEY with respect to effective team play. As many coaches talk about support, you'll find that many players have many different ideas on what that means.
Coach Ron quote: "We can only get better by knowing the truth."
So before we discuss Support, first ask yourself these questions and be honest to yourself:
- Are you watching the play or trying to get into it?
- Do you make the pass and sit back to admire how good that pass was or skating into position to become a threat?
- Do you watch the faster players get in the zone or do you try to keep up with them?
- Do you watch the shot on net or crash the net?
- Do you fore and back check as hard as you can or quit at the red line?
As with most sports, one of the primary goals is to achieve an odd man advantage in your favor, simply put outnumber the opponent in the area of the puck (defensive, offensive or neutral zones), thus creating a 2 on 1, 3 on 2, man advantage around the puck and or puck carrier.
Support is about what you're doing with out the puck.
Support Means:
- Skating to an area of the ice where the puck carrier has an easy pass option to you ''support the puck''.
- Backing up a teammate who is engaged in a one on one battle defensively ''safety valve''.
- Driving to the net on the initial attack ''crash the net'', giving the puck carrier the option of throwing the puck at the net hoping for a rebound.
- Passing the puck to a player and skating to become open again ''Give and Go'' (Do not watch your pass).
- Getting into an area to become a scoring threat.
- Skating without the puck!!!!
The most dangerous player on the ice is the one that understands the principle of ''Support'' and knows how to use it effectively to ''read and react'' and get into proper position
As you can see by the chart above at least 80% of the game is played without the puck. This chart shows to exciting part of the game, the part of the game players will enjoy working on with little prompting from the coach. The coach can and should have a greater impact helping motivate and teaching the player how to play away from the puck.
Playing away from the puck:
- Provide pass support.
- Create time and space.
- Become a scoring threat.
- Provide insurance (cover for the D).
Puck ready position This means that at any given point in time you are ready to receive a pass. Keep your stick down on the ice ready to get the puck! You need to have you stick on the ice at all times. If it is not, you can not provide a target for the passer, you have trouble receiving a pass (Because you have to react and get your stick down), you have trouble deflecting and intercepting passes, etc. So it is very important to have your stick on the ice.
Ice Awareness Ice awareness is the ability of the puck carrier to see the entire ice surface, the location of all the players and the availability of different options for the puck carrier.
Counting Numbers With Ice awareness, the puck carrier can count numbers. Basically reading how many team mates and how many opponents are in the vicinity of the puck to identify whether the situation is a 1-1, 2-1, etc.
Read and react Once the puck carrier has ìIce Awarenessî and has counted the numbers, he can read and react to the position and play. Read and react means the puck carrier reads the ice surface and understands the positioning of his teammates as well as the positioning of the opposing players. The puck carrier reads the opposition pressure and looks for open teammates supporting the puck. If no one else is near the puck, the puck carrier can control the puck himself by skating with it. If the puck carrier is out numbered two to one, he will most often move or pass the puck to avoid the checking pressure.
General line changes Don't kill yourself with long shifts, especially early in the game. Tired players make mistakes and you are more susceptible to injury. 45 second shifts!
The thought process of a 45 second shift:
- Bust your butt for 25 seconds.
- Now start looking for a good opportunity to change.
You need a good understanding of the fundamentals and know how to execute on those fundamentals in order to become a hockey player.
Wednesday, November 6, 2013
Defensive Zone Basics

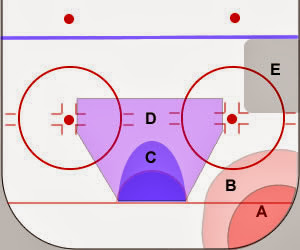
The above picture illustrates the basic areas within the defensive zone. Each area has it's own set of basic principles and roles of the player in that zone. It is important that you understand the areas and the principles that apply to them in order to defend your defensive zone effectively. The areas and principles are as follows:
- A. HIT ZONE - Defensemen must body checks, seal off players, pin them to boards, and above all DO NOT GET BEAT 1-1.
- B. SUPPORT ZONE - Stay between the puck and the net, quickly find and attack loose pucks. CONTAINMENT.
- C. WAR ZONE CREASE - Feet pointed up ice (to see attackers), scan for loose players, lock them up if they become a threat.
- D. WAR ZONE - Head on a swivel!! Watch back door, support Point Zone (left winger).
- E. POINT ZONE - Head on a swivel, weak side winger should move more to the high slot area, this keeps his point covered and he is naturally in the passing lane.
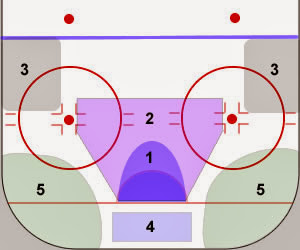
 In the picture above you will see 5 areas, marked by priority and order of where goals are scored.
- Area 1 the war zone crease, is where the most goals are scored.
- Area 2 the slot area, or war zone is where the next most goals are scored from.
- Area 3 is where many scoring opportunities are created if shots from this area reach the crease.
- Area 4 behind the net. This is another area where opportunities are created by wrap arounds and passes to players in the war zone.
- Area 5 this is a minimal scoring threat and little danger.
NHL Videos watch how the pros do it!
Tuesday, November 5, 2013
Breakout Patterns
- When in doubt, GET THE PUCK OUT.
- Boards are your friends, use them and stay close to them.
- Center swinging needs to think "Safety first!" and time your swing (control skate). If breakout pass is intercepted low, be ready to defend! Don't get caught swinging out of the slot.
- Weak side winger, watch how play develops sometimes you need to cover for the center "Safety first".
- Wingers need to get below hash marks, look at fore checker before the puck comes your way. Don't be afraid to skate to the puck, if pressure is heavy.


