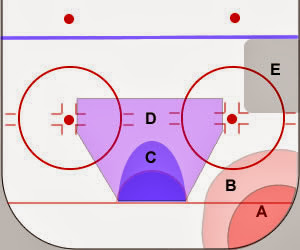
The above picture illustrates the basic areas within the defensive zone. Each area has it's own set of basic principles and roles of the player in that zone. It is important that you understand the areas and the principles that apply to them in order to defend your defensive zone effectively. The areas and principles are as follows:
- A. HIT ZONE - Defensemen must body checks, seal off players, pin them to boards, and above all DO NOT GET BEAT 1-1.
- B. SUPPORT ZONE - Stay between the puck and the net, quickly find and attack loose pucks. CONTAINMENT.
- C. WAR ZONE CREASE - Feet pointed up ice (to see attackers), scan for loose players, lock them up if they become a threat.
- D. WAR ZONE - Head on a swivel!! Watch back door, support Point Zone (left winger).
- E. POINT ZONE - Head on a swivel, weak side winger should move more to the high slot area, this keeps his point covered and he is naturally in the passing lane.
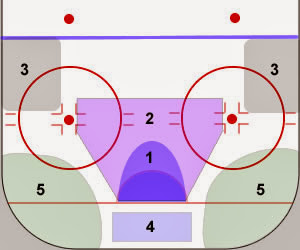
 In the picture above you will see 5 areas, marked by priority and order of where goals are scored.
- Area 1 the war zone crease, is where the most goals are scored.
- Area 2 the slot area, or war zone is where the next most goals are scored from.
- Area 3 is where many scoring opportunities are created if shots from this area reach the crease.
- Area 4 behind the net. This is another area where opportunities are created by wrap arounds and passes to players in the war zone.
- Area 5 this is a minimal scoring threat and little danger.
No comments:
Post a Comment